![]()
![[picture of underwater camera]](cam-001.jpg) |
Underwater Photography Part 3Text And Photographs by Paul Janosi Macro Photography - Using Extension Tubes |
![[picture of underwater
camera]](bluetang11.jpg) |
| |
Underwater Macro Photography is amazingly simple to perfect because the guess work is removed from focus, exposure and framing. The results are rewarding because the miniature creatures of the sea add a fascinating new dimension to underwater photography.
The Nikonos is the most rugged, versatile and compact underwater 35 mm camera system
available, making it ideal for working in close quarters. The standard 35 mm lens has a
limited focusing range from infinity to approximately 2.75 feet. However, by adding a
variable amount of extension between the camera and lens, the minimum focusing distance
can be reduced. 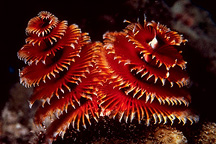
Underwater Photography Part 1
Underwater Photography Part 2
Extension Tube
Focus
Magnification
Depth of Field
Framing
Step by step instructions
Older Cameras
Subject Selection
Underwater Photography Part 4
Underwater Photography Part 5
Extension Tube
The extension tube is an aluminum tube with machined bayonet mounts at each end, that
couples with the Nikonos body and lens. The end that fits into the Nikonos body is fitted
with an "O" ring, therefore making it water tight. There is no lens in the tube
to aid magnification, it is the extension of the distance between the camera and the lens
that produces the increase in magnification. Since the extension tube contains no lenses,
your picture made with them will be as sharp as your camera lens will permit. To prevent
stray light from fogging your film, the inside of the extension tube has anti-reflection
threads and a dull black finish.
Focus
Since the addition of an extension tube changes the minimum focusing distance, the tubes
are supplied with a focal framer to ensure correct focus. The focal framer is a device
that not only indicates the exact camera to subject distance, but also produces a frame
around the entire picture area. In order to prevent the framer from appearing in the
picture area, the framer is 1/4 inch larger than the border around the picture area. The
framers are made of stainless steel and are coated with black epoxy or paint to prevent
reflection of light. The tubes and frames can be separated for cleaning and easy packaging
for travel. For quick identification and assembly, the tubes and framers are colour coded.
Magnification
Extension tubes are available in different sizes and magnifications. There are at least
four sizes available for the 35 mm lens; 1:1, 1:2, 1:3 and 1:4, and three sizes for the 28
mm lens; 1:1, 1:2 and 1:3 tubes are added together. The ratio between the actual object
size and image size recorded on film is termed "magnification: and is expressed as
the reproduction ratio M=1/O, where "M" is magnification, "I" is the
image size and "O" is the object size. For example, if the image size recorded
on the film is one third the object size, the reproduction ratio is said to be 1:3.
We can quickly estimate the size (magnification) of an extension tube used by thinking in terms of the height of the 35 mm negative, as compared to the height of the focal framer used. If we round off the height of a height of a 35 mm negative to 1 inch and the area framed is about 1 inch high, it is a 1:1 extension tube. If the framer used is 2 inches high, it is said to be 1:2, 3 inches high, 1:3 and 4 inches high is 1:4.
 Depth of Field
When the camera is focused on an object, there is an area in front of and behind the
object that also appears to be in sharp focus. This area extending in front and behind the
plane of the sharpest focus is referred to as "Depth of Field". Contrarily to
regular photography, when the object distance is less than 8 times the focal length of the
lens, the depth of field becomes approximately the same in front of the focused distance
as behind.
The greater the extension of the lens from the camera, the greater the magnification and the more shallow will be the depth of fields. Since at 1:1 reproduction ratio the depth of field at f22 is only about 1/4 inch, at 1:2, 1/2 inch, at 1:3, 3/4 inch and at 1:4, about 1 inch, it is clear that a small aperture and careful placement of the subject, if it has depth, will be necessary.
Framing
Frame the subject in the center of the framer with an imaginary 1/4 inch border on all
sides. The subject will automatically be n sharp focus. The composition can be easily
nudged while viewing the subject withing the framer. Remember to look at the subject from
the same plane as the camera lens is seeing it, otherwise you will not get the same
perspective as the lens sees.
Taking pictures underwater is surprisingly easy with the automatic exposure control of the Nikonos V and the TTL circuitry of the SB103 or SB102 strobes. In macro photography all camera and strobe controls are preset.
 To do
this, change the ISO film speed dial. For more exposure use a lower setting. For less
exposure use a higher setting. Halving or doubling the ISO setting, changes exposure by
one stop.
To do
this, change the ISO film speed dial. For more exposure use a lower setting. For less
exposure use a higher setting. Halving or doubling the ISO setting, changes exposure by
one stop.
Older Cameras Manual exposure with Nikonos II, III, or IV is easy once you know what strobe to subject distance to use.
Although it is possible to calculate the proper subject to flash distance give the ISO of the film, the guide number of the flash and the magnification of the extension tube, it is far simpler to arrive at proper exosure through a few tests in a bath tub or a swimming pool.
 The easiest way to
do this is to purchase some plastic flowers. The best colours to get are blue or green,
white or light yellow, and deep red or brown.
The easiest way to
do this is to purchase some plastic flowers. The best colours to get are blue or green,
white or light yellow, and deep red or brown.
First set up with a 1:1 extension tube. Set the f stop to 22 and the shutter speed to 1/60 or 1/90 sec. Place the flash on top of your Nikonos, aim it on the framer and take a picture. Next, move the flash 2 inches forward and take another picture. For the third shot move the flash 2 inches behind the Nikonos and take another picture.
Repeat the above procedure for each of the three colours and for each of the extension tubes you plan to use, keeping careful records for each exposure.
Repeat the above procedure for each of the three colours and for each exposure.
Based on the results of the developed film the optimum exposure can be selected and for simplicity in actual use, it can be written on the back of the strobe. For example:
| Nikonos SB103 ISI 100 film F22 at 1/60 sec |
|
| EXTENSION TUBE | CORRECT EXPOSURE |
| 1:1 | 6.0" |
| 1:2 | 8.0" |
| 1:4 | 9.5" |
The above exposure will work with a subject of an average brightness. However, one must compensate for the reflective subjects by moving the flash back about 2" or for dark subjects by moving forward about 2".
Subject Selection
Probably the best way of locating subjects for close up photography is to dive with
somebody who knows the area. Ask your dive master where you can find a particular subject.
Chances are, they have seen whatever you are looking for and know exactly where to find
it. Approach your subject away. Feeding fish is the only way of getting close enough to
them to fill the frame. Don’t cast shadows. Animals such as tube worms have light
sensitive organs and will withdraw into their tubes when a shadow is cast over them. Be
patient. What goes in must come out! Tube worms will usually come out in a couple of
minutes.
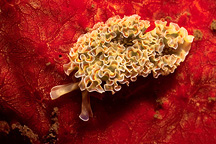
Most things that are good for macro photography are very delicate creatures. They usually hide between cracks in the coral, or under a lece or beneath a rock. Make sure that you place rocks back in the same position as you found them, otherwise you could be killing some organism that makes his home under the rock. And always put the organism back where you found it if you have taken it away from its hiding place.
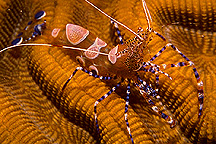
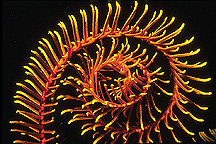
Night diving is probably the best time for macro photography. All crustaceans (shrimps, lobster, etc.) Come out at night. You will also be able to find echinoderms (starfish, brittle-stars, basket-stars, crinoids, etc.) At night much easier than during the day. Sponges are probably the easiest to find and photograph. Shine a light on a sponge and you may find that it has a briliant colour that is only visible when the light strikes the subject. Remember that the colours are not what they seem to be, and that at a 100 feet you will not be able to find red sponge unless you use a light. Stay close to the reef or close to the wall when looking for macro subjects. Most things are so small that you could miss them by swimming too far from them.