![]()
 |
Underwater PhotographyBy Paul Janosi Using the Nikonos Close-Up Outfit (Part 4) |
 |
| |
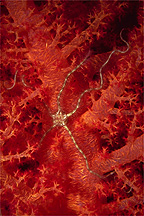
Without a doubt close up underwater photography is one of the easiest underwater photographic techniques to perfect. Even beginner underwater photographers can get sharp well exposed, colorful pictures on their first dive.
Underwater Photography Part 1
Underwater Photography Part 2
Underwater Photography Part 3
Magnification
Picture Area
Depth of Field
Choice of Film
Manual Exposure
Advantages
Step by Step Instructions
Underwater Photography Part 5
Magnification
 The construction of the
close up lens is such that the same optics are used with either the 28 mm, 35 mm or 80 mm
lens. Magnification and subject area covered is 1:6 ( 5 5/8" x 8 1/2" ) with 28
mm lens, 1:4.5 ( 4 1/4" x 6 7/16" ) with 35 mm lens and 1:2.2 ( 2 1/16" x 3
1/8" ) with 80mm lens.
The construction of the
close up lens is such that the same optics are used with either the 28 mm, 35 mm or 80 mm
lens. Magnification and subject area covered is 1:6 ( 5 5/8" x 8 1/2" ) with 28
mm lens, 1:4.5 ( 4 1/4" x 6 7/16" ) with 35 mm lens and 1:2.2 ( 2 1/16" x 3
1/8" ) with 80mm lens.
Since the magnifications/subject size covered are different then those covered by the extension tubes used in macro photography the close up outfit should be considered as an addition rather then an alternate to extension tubes.
Picture Area
The area represented by the framer is 3/8" larger than the actual coverage of the
lens in both vertical and horizontal directions.
Depth of Field
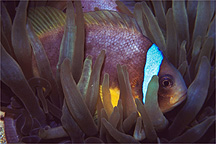
The depth of field is extremely shallow in close up photography. Make sure that the main
point of interest in your close up picture is between the framer where it will be sharply
focused. For example: if the creature has eyes, as long as the eyes are sharp the viewer
will tolerate blur in the legs, tails or antenna.
 With the close up lens
when the 28 mm lens is preset to f22 the depth of field is about 3"; with the 35 mm
lens it is about 2" and with the 80 mm lens it's about 1/2".
With the close up lens
when the 28 mm lens is preset to f22 the depth of field is about 3"; with the 35 mm
lens it is about 2" and with the 80 mm lens it's about 1/2".
Choice of Film
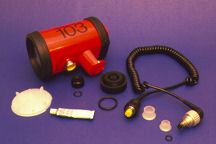
The choice of film is dictated by the power of the strobe in use. With the Nikonos SB 102
a good film choice is ISO 50 or 64. With the less powerful Nikonos SB 103 strobe ISO 100
is recommended.
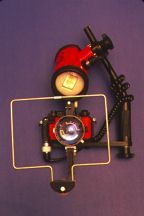
 Front lighting is the best to use
with the Nikonos close up kit. Side or top lighting will cause a shadow of the framer to
fall on the subject.
Front lighting is the best to use
with the Nikonos close up kit. Side or top lighting will cause a shadow of the framer to
fall on the subject.
With the SB 102 the built in the target light can be used to aim the strobe to the centre of the framer. After aiming is completed the target light should be turned off to conserve power.
Manual Exposure
The close up outfit can be used with all of the older models of Nikonos cameras, however
it can only be used on TTL with the Nikonos V.
With the older cameras the shutter speed is preset to either 1/60 or 1/90 sec depending
on the camera model used. The  exposure is
controlled based on the flash to subject distance. To determine manual exposure refer to
detailed instructions discussed in "Underwater Macro Photography".
exposure is
controlled based on the flash to subject distance. To determine manual exposure refer to
detailed instructions discussed in "Underwater Macro Photography".
Advantages
One additional feature of the close up outfit is that it can be removed under water so the
photographer can switch back and forth between close up and the lens in use.
Step by Step Instructions
The following list provides step by step instructions for taking close ups with the
Nikonos V camera and Nikonos SB 102 or 103 speedlight: