![]()
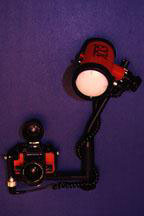
 Nikonos V (w/ 15mm and 20mm Lens) |
Underwater PhotographyBy Paul Janosi Wide Angle Underwater Photography (Part 5) |
 Nikonos V (w/ Nikonos SB 103 Speedlight) |
| |
A wide angle lens is a must for taking pictures of scenes, people, shipwrecks or shooting in poor visibility (Canadian lakes and rivers). By keeping the camera to subject distance to a minimum, the scattering effect of suspended part icles in the water can be reduced, resulting in increased colour saturation and contrast. Wide angle lenses are also more forgiving than other lenses. In low light situations their great depth of field even with large apertures provides sharp images. S ince the magnifications/subject size covered are different then those covered by the extension tubes used in macro photography the close up outfit should be considered as an addition rather then an alternate to extension tubes.
Nikon has two underwater wide angle lenses to choose from, the 20mm wide angle lens and the 15 mm ultra wide angle lens.
 20 mm Wide Angle Lens
15 mm Ultra Wide Angle Lens
Lighting and Exposure
Exposure
Available Light Wide Angle
Normal Wide Angle
Close Focus Wide Angle
Perspective
Hyperfocal Distance
Recognizing Colours
Film
Keeping Records
Underwater Photography Part 1
Underwater Photography Part 2
Underwater Photography Part 3
Underwater Photography Part 4
 20 mm Wide Angle Lens
The 20 mm lens was designed for underwater use exclusively. It has an angle of coverage of
78 degrees and focuses from 1.3 feet to infinity. This allows you to get extremely close
to a large subject yet include the entire subject in the picture.
The focus and f stop scales are located on the two side control knobs. On one side you will find the colour coded f stop scale and on the other a corresponding colour coded focus scale. The depth of field scale is a series of lines covering the diamete r of the focusing knob.
The depth of field is considerable. For example when focused to 3 feet at f 11, the depth of field extends from 1.6 feet to infinity. At f 5.6, it extends from 2 feet to 6 feet.
A special optical view finder is necessary when using this lens. It mounts on top of the Nikonos camera and is secured with a spring loaded thumb screw. The view finder shows about 85% of the actual picture area. A 28 mm viewing mask can be attached to the front of the viewer to allow use with the 28 mm lens. The viewfinder is parallax corrected for 4.5 apparent feet with the 20 mm lens and 6 apparent feet with the 28 mm lens. There are also parallax marks for closer distances with both lenses.
15 mm Ultra Wide Angle Lens
The 15 mm lens was also designed exclusively for underwater photography. The lens has a 94
degree picture angle, has aperture settings from f 2.8 to f 22 and focuses from just under
a foot to infinity.
There are two 15 mm underwater lenses commonly seen. The "old" 15 mm was designed for the manual Nikonos camera models I, II and III. The "new" Nikonos 15 mm was designed for automatic use with the Nikonos IVA and V cameras. The lenses are interchangea ble and either can be used on any of the 5 Nikonos models provided manual operation is selected.
This lens must be used in conjunction with an optical view finder. The viewfinder is similar to the one used with the 20 mm lens. It is masked to yield a rectangular field of view covering approximately 90% of the picture area. There are also two types of view finders. The "old" viewfinder is attached to the camera in two places. It has a mount of its base that slides into the Nikonos accessory shoe on top of the camera and it has a "C" clamp type fitting, that secures it to the bottom of the camera body. The "new" viewfinder is smaller and mounts on top of the Nikonos body and is secured with a spring loaded thumb screw. Parallax is compensated for a 5' apparent camera to subject distance. In addition parallax compensation marks are provided at 2 feet and 1 foot.
The viewfinder can be focused underwater by moving it slightly closer or further from the photographers eye.
 Lighting and Exposure
Even lighting is the key to successful wide angle underwater photographs. This is achieved
by combining available light and fill flash with the later in the foreground and the
former in the background.
The Nikonos SB102 with a wide angle diffuser is an ideal high power flash unit, and so is double flash system using two SB103 flashes. These are the most sophisticated and complex systems in terms of lighting equipment and designed for underwater photog raphy.
Exposure
The key to balanced lighting is accurately measuring the available light and then
adjusting the power of the flash unit(s) to match it. Although the built-in metering
system can be used to determine exposure, an auxiliary light meter such as the Seconic
marine meter is often quicker and easier to use.
In deep water it is quite common to use exposure of 1/30 or 1/60 seconds. The strobes are used on manual and the power is reduced to 1/4.
Wide angle lenses can be used to take a variety of photographs.
Available Light Wide Angle
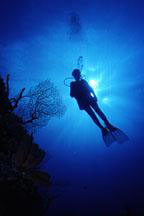
Whole shipwrecks, large marine animals and broad reef scenes are best photographed with
available light. The pictures look more realistic. Using available light eliminates the
problem of backscatter, the reflections of strobe light bouncing back from s uspended
particles in the water. With available light it is often best to work with silhouettes. On
shipwrecks you can use upward camera angles to silhouette railings, masts, winches and
superstructures. These structures symbolize a sunken ship. Adding the silhouette of a
diver emphasizes exploration.
 Normal Wide Angle
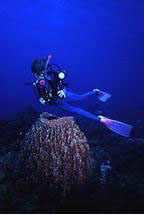
To improve your diver photographs, select a colorful subject and position the diver 1 to 2
feet behind it. Measure the available light and set the aperture accordingly. Position the
flash such that it comes from the opposite direction to the divers fac e so that the face
mask can be illuminated. Set the flash to subject distance to match the available light.
Close Focus Wide Angle
Because the wide angle lens has an extraordinary depth of field, it can be positioned very
close to the subject. For instance, when the 15 mm lens is focused at minimum distance and
the aperture is set to f 22, the pictures will be sharp from 6 inches t o 3 feet. This is
ideal to photograph small marine life/diver interaction. For example, have your model hold
a sea horse about 4 inches away from her face mask. Place the lens about 5 inches from the
sea horse and hold the flash at a distance that wil l give f 22 exposure. Usually this is
at 1 foot from the subject. It is best to center the lens by eye because the viewfinder is
not very accurate at close distances. This technique will result in a perfectly exposed
sea horse and divers head and a bla ck background.
Another variation of the closes focus technique is to find a bright subject such as a feather star or sea anemone. Compose the picture such that the marine life subject selected is in the foreground and the diver in the background about 10 feet away. Up ward angles with a bright sunburst is the best for this type of shot. At f 16, when the 15 mm lens is focused to 1.5 feet, the picture will be sharp from .9 feet to infinity. Position the flash to have an exposure of f 16 (about 1.5 feet from subject) a nd aim it on the bright coloured foreground subject. Since the diver model will be above the subject and in the sunburst, he or she will be silhouetted against the surface water. The result is a spectacular photograph of colourful marine life and diver silhouette.
Perspective
Wide angle lenses offer a different perspective than any other lens. Object positioned two
feet or less appear gigantic and objects 10 feet or further appear very small. This
exaggerated perspective can be used to create the illusion of greater underwa ter
visibility than it really is. Composing with perspective distortion can also yield some
exciting images. For instance if you are photographing a diver and a fish, compose the
image such that the fish is closer to the lens than the diver is. This wi ll make the fish
look much larger and more dramatic.
Small tunnel openings or archways near the camera lens can appear as vast caverns when used to frame distant divers.
 Hyperfocal Distance
When focusing by scale, foreground sharpness can be increased by using a maneuver known as
hyperfocal distance. When photographing distant subjects, simply focus the camera to some
nearer point which allows the depth field to extend back just to infinit y. For instance
when the 15mm lens is focused to 3 feet at f 8, the depth of field extends from 1.75 feet
to infinity. The hyperfocal distance varies with f number and the focal length of the
lens.
Recognizing Colours
Due to selective absorption of light at depths below 60 feet, colours appear dark and
drab. Therefore you can easily swim past many colourful underwater scenes without
recognizing them. The best way to find colourful subjects is to use a handlight. Sw im
slowly and very close to the reef and shine the light. You will be surprised at how many
colourful things you will see. With experience you will learn to identify those subjects
that will be colourful when photographed with flash.
Models outfitted in colour co-ordinated diving equipment can also enhance your photographs. Lycra suits come in a variety of bright colours. They are inexpensive and lightweight. My favorite colours are yellow, orange and blue. I never leave for a div e trip without them.
 Film
Film
For wide angle photography my personal preference is foe E-6 compatible films. Either
Fujichrome 100 or Ektachrome 100 will do a good job. Some people prefer 50 ISO film
because it has a finer grain structure and higher resolution, but I find that at d epths
below 50 feet, it is hard to use with available light. On the other hand 100 ISO film will
give an exposure of f 4 at 1/30 to 1/60 second. With the 15 mm lens focused at 4 feet, the
depth of field is 2.5 feet to 10 feet.
E-6 compatible films have an affinity for blue which the colour of water in the background. Their main advantage however is that they can be processed in the field. There is no better way to learn underwater photography than to see the results the same day.
Keeping Records
Last, but not least, it is a good idea to keep records of your shots, film, f stop,
shutter speed, camera, lens, and flash or flashes used. I keep this information as part of
my dive log. When you have your film processed, review your notes to see what combination
of equipment used gave you the desired results. When you have hundreds or maybe thousands
of individuals images sitting in front of you, it is hard to remember, if not impossible,
where and how the particular image was taken.